
The step by step guides below help you discovering the functions of Golf Range Hero quickly:
Getting started
Follow those first steps when using Golf Range Hero. This step-by-step procedure guides you in setting basic user data and acquiring the first data. After this intro you are enabled to use the basic function of Golf Range Hero for your golf practice sessions
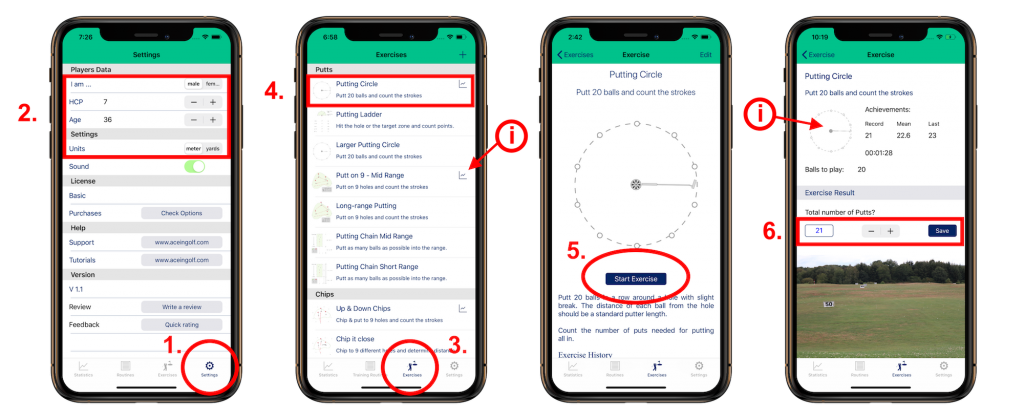
Steps 1-2: Go to the settings menu (1.) and set your personal user data such as gender, HCP and Age. This info is needed for your performance evaluation. Also set your preferred units - either meter or yards.
Steps 3-4: Change to the exercise menu (3.). Here you find the list of exercises for all playing areas. Info: Some of the exercises are marked by a small symbol of a graph - those are performance exercises that -dependent on your result - give you an indication of your HCP. Select one of the exercises to continue (4.).
Step 5: After reading the exercise procedure press the START EXERCISE Button to continue with data acquisition.
Step 6: Input your result and press SAVE. Info: If you want to access the exercise details press on the picture. After starting the exercise a time counter is running to record the time spent for this exercise.
To delete the data you have just acquired follow the Delete Data Instruction.
Delete Data
Sometimes it happens that you do a mistake and you want to delete acquired data. Any data you create can be deleted. How it works? Follow the below step-by-step guides.
Delete Exercise Data
Follow the below steps to delete data of an exercise you acquired. Warning: Deleted data can not be restored!
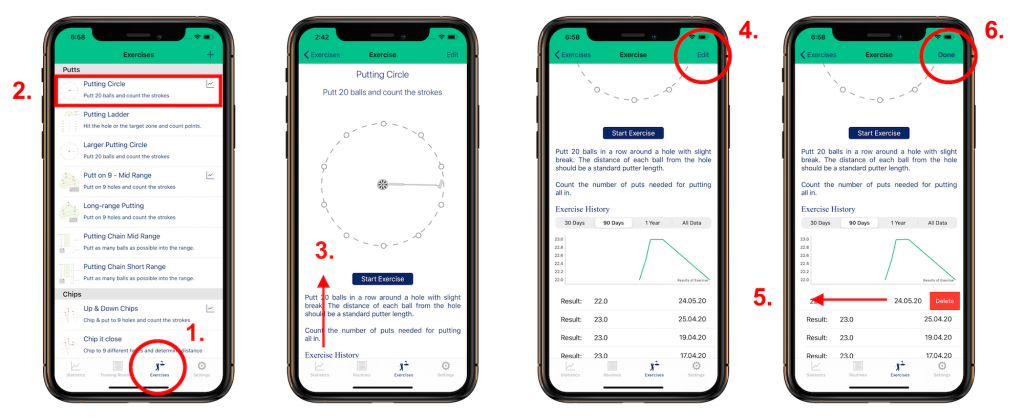
Steps 1-2: Go to the exercises menu and select the exercise for which you want to delete data.
Step 3: Swipe down to the bottom of the exercise screen where you will find a table with all exercise data. Using the selector you can define the period of acquired data. This might help you to find the data set you want to delete.
Step 4: Press on the EDIT button to activate the edit mode that allows you to delete data.
Steps 5-6: Go to the line item in the table you want to delete and swipe to the left. A long swipe will delete it. A short one will open a button to be pressed to delete the data set. By pressing the DONE button you close the edit mode.
Using your Watch with Golf Range Hero
Using your iWatch as input device for some of the exercises makes your practice sessions more efficient.
Launch the Practice Assistant on the Watch
Before using your iWatch as input device for the first time please open Golf Range Hero on your Watch. Please install it manually if the watchOS version has not been added automatically.
Steps 1-2: Launch Golf Range Hero on your iWatch. Activate the Watch-Switch and press the Assistant button in the upper right corner of the Exercise view. Make sure that the the watchOS Golf Range Hero app is active when pressing the button.
Follow the instructions on your Watch guiding you through the exercise. Inputs on the watch are directly transmitted to the iPhone. By sweeping from right to left on the watch screen (button area) you can correct an input.
Recommended Settings for the Watch
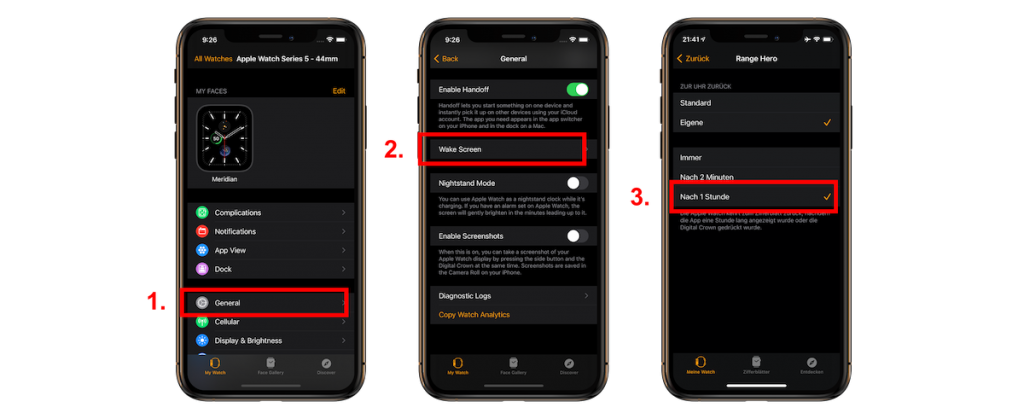
We recommend to adapt the standard settings of Golf Range Hero on the Watch to avoid that the app enters automatically into the background when practicing.
Access the watch settings on your iPhone: AppleWatch "General" > "Wake screen" > Go to Golf Range Hero > "Back to watch: after 1 hour "
Trouble Shooting
I don't find the app on my watch
Please enter the watch Settings on your iPhone, scroll downwards and look for Golf Range Hero. Press the install-button.
Assistant is not starting
It has been reported that sometimes the connection between watch and iPhone is not properly working after installation. If this happens please enter the watch Settings on your iPhone, scroll downwards and look for Golf Range Hero. Press on the icon, deactivate the switch and activate it again. After this you can try again.